Figuring out how to wash eyelash extensions can be a little confusing. Aren’t you supposed to avoid water? How can you wash your lash extensions without pulling them off?
We’ll explain everything you need to know about washing both professional and DIY lash extensions correctly, so you can keep them looking great for as long as possible.
Why Washing Your Eyelash Extensions Is Important
Washing your lash extensions is extremely important for keeping your eyes safe and healthy. Dust, oils, and debris can get trapped between your lashes and your natural lash extensions, which can lead to irritation, itchiness, and even eye infections. Washing your extensions regularly gets rid of that buildup and prevents issues.
Washing your extensions will also help with their longevity, since that oil buildup can also weaken the glue that keeps them attached to your natural lashes. Finally, keeping your lashes clean and groomed simply ensures that they’ll look their best!
What To Do When Washing Eyelash Extensions
So let's get to the heart of the matter - how to wash your eyelash extensions correctly, without irritating your eyes or weakening the glue!
Step 1 - Gather Your Equipment
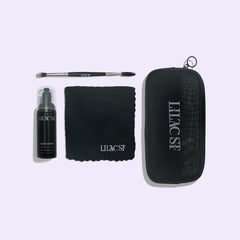
To wash your extensions effectively, you will need an extensions-safe cleanser, a soft, round cleansing brush, and a cloth to dry the area around the eyes. The problem with most face wash products is that they’re made with strong cleansing agents that can compromise your lash glue. Plus, products designed for the face are more likely to sting if they get into your eye, while lash extension cleansers are usually designed to be tear-free.
To eliminate guessing games, we created a full Lash Bath Kit that includes all the basics you’ll need to wash your extensions. Our tear-free Lash Shampoo is gentle and effective, and it’s excellent for both Lilac St. DIY lash extensions as well as professionally-applied ones.
Step 2 - Remove Makeup
Before you can wash your extensions, it’s important to first remove all makeup around the eyes. For best results, you can use a soft makeup remover cloth like the one in our Lash Bath Kit, or opt for an oil-free makeup remover.
Be careful to wipe the skin around the eyes without wiping over your lashes, since any friction can lead to lash loss. If you wore eyeliner close to the lash line, use a cotton swab to wipe it away carefully.
Step 3 - “Shampooing” Your Lashes
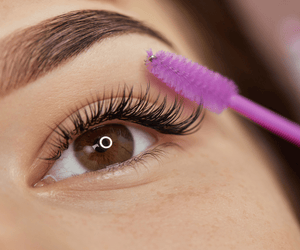
Now, your extensions are ready for washing! Dispense a pump or two of your lash cleanser of choice in a cap or the palm of your hand. If necessary, add a bit of water and swirl your lash cleaning brush to foam up the cleanser.
Then, close your eyes, and gently use the brush to wipe the lashes. There doesn’t need to be too much cleanser on your brush. In fact, if you use too much you’ll have a harder time rinsing it away.
You’ll probably want to wash one eye at a time, while keeping the other eye open so you can see what you’re doing.
Wipe at your lashes in gentle, downward motions. If you’re wearing DIY lash extensions, make sure to clean both from above and from below. With professional extensions, cleaning just from above will probably suffice.
If you don’t have a cleaning brush, you can use your ring finger as long as you’re careful not to apply any pressure. The goal as you’re cleaning is to glide over the lashes without pulling.
Step 4 - Rinse
Once you’ve finished washing your lashes, it’s time to rinse away the foam. Cup a bit of water in the palm of your hand and splash it against your eye. All of the foam should disappear easily, and if it doesn’t, you’ve probably used a little too much cleanser.
Step 5 - Dry
Now that your lashes are washed and cleansed, it doesn’t mean that you’re totally done. Your next step should be to dry the area around the lashes carefully. Using your softest towel or microfiber cloth, gently pat at the area around your eyes.
Avoid rubbing; patting is kinder to the delicate skin around your eyes, and it’ll also minimize the risk that you’ll accidentally pull off some lash extensions.
As for the actual extensions, it’s better to let them air dry since any contact while they’re damp can lead to some lash loss.
This isn’t an issue if you’re rocking DIY extensions from Lilac St., though. You can pat them gently with our makeup towel to speed up the drying time.
What Not To Do When Washing Eyelash Extensions
Now that you know how to wash your eyelash extensions, we have a few more important suggestions and reminders.
- Don’t wash them too soon. Ask your lash technician when you can let your lashes get wet after the initial application - it can take up to 48 hours.
- Don’t be aggressive. Any friction can lead to losing precious, expensive extensions. DIY lash extensions will hold up to a bit more friction (and they’re also easier to re-apply), but it’s still best to be careful.
- Don’t brush your lashes while they’re wet. While they’re damp, your lashes might be a little more brittle, so avoid brushing them.
- Don’t just use whatever cleansing product. Stick to lash-extension safe cleansing formulas that won’t compromise the adhesive.
- Don’t use anything uneven or rough. Cotton pads and regular towels are off limits because they can create friction.
- Don’t put your face under the shower head. If you’re washing your eyelash extensions in the shower, be careful not to place your head directly under the shower head. The pressure can damage your lashes and lead to loss of extensions.
What To Do After Washing Eyelash Extensions
Washing isn’t the only aspect of correct lash extension care. Here are a few more quick tips for once you’re done washing.
- Let your lashes dry completely before touching them.
- Brush your lashes regularly with a clean spoolie brush to detangle and keep them looking fluffy.
- Use oil-free skincare products around the eyes in order to avoid breaking down the lash glue.
- Wear a face mask to sleep to avoid rubbing your lashes against the pillow.
Clean Lashes Are Happy Lashes
Learning how to wash your lash extensions is pretty easy! It’s not complicated at all, but you want to make sure to do it correctly and gently. Avoiding friction while keeping your lashes clean is the ultimate secret to having long-lasting, beautiful extensions. So stay washed, and keep on batting your gorgeous lashes!
- Eyelash Extensions Aftercare: A Complete "How-To" Guide
- How To Take Care Of Eyelash Extensions?
- How To Clean Eyelash Extensions?
- How To Wash Eyelash Extensions?
- How To Remove Eyelash Glue? 4 Easy Steps
- How To Make Lash Extensions Last Longer?
- Can You Swim With Eyelash Extensions?
- How To Shower With Eyelash Extensions? Useful Tips And Aftercare
- How To Wash Your Face With Eyelash Extensions? 6 Easy Steps
- How To Sleep With Eyelash Extensions? 10 Proven Tips And Tricks


