Feeling like it’s time for change? Maybe you’re experiencing some eye irritation from your lash extensions, or perhaps you’re just in the mood for a new look — either way, you might be curious to learn how to remove your eyelash extensions at home.
Typically, lash extension removal is done by professionals. But if you’re short on time or you’ve had issues with your lash tech, doing it by yourself is totally doable. However, it’s important you take your time and remove your lashes correctly, or else the process can damage your natural lashes.
In this guide, we dive deep into all of the methods for lash extension removal. We’ll focus on professional extensions, which are tougher to remove, but we’ll also touch on lash clusters removal.
Understanding Lash Extension Basics
Lash extensions are synthetic fibers that are bonded to your natural lashes in order to create a fuller lash line. Different densities and lash maps can create different lash extension styles, from sultry cat eyes to large doll eyes.
Lash extensions are attached to the natural lashes with a strong, waterproof cyanoacrylate-based adhesive. The adhesive bond is incredibly strong, ensuring weeks of wear, and it can only be weakened with specific dissolvers.
Why Remove Eyelash Extensions? (and When)
There are a few reasons why you may want to remove your lash extensions, ranging from the health-focused to the aesthetic.
When it comes to your eye and skin health, a little bit of redness or sensitivity for a day or two following your lash extension application is normal, but anything beyond that and removal is essential.
If you experience significant discomfort, redness, itching, or signs of an allergic reaction that last for several days, removing your extensions is crucial and should be done as soon as possible.
You may also want to remove your extensions if you’ve been getting lash extensions consistently for months and you notice that you’re starting to shed natural lashes and that your lash line is getting sparse.
Aesthetically, you’ll probably want to remove your extensions once you don’t like the look anymore.
Maybe it’s a change in taste, or maybe your lashes don’t look even or full enough anymore. Most people who get lash extensions opt for refills every 4 weeks to maintain fullness and symmetry, but removing the professional extensions is just as valid — especially if you’re ready to try with alternative options, like lash clusters.
What If You're Having an Allergic Reaction Before You've Started Removal?
If you suspect you're having an allergic reaction to your lash adhesive, significant swelling, persistent redness, or itching, the priority is getting the extensions off as quickly as possible. Skip oils, since they work too slowly for an active reaction. Use a professional lash extension remover or book a same-day salon removal. Once the extensions are off, consult a healthcare provider for guidance on managing the reaction itself.
DIY vs Professional Removal
Taking lash extensions off at home can be safe, but only as long as you do so slowly and carefully.
In a professional setting, your lash technician has the training to remove your extensions safely. They also have access to dissolvers designed to work with the specific adhesive they use. Those dissolvers are eye-safe yet able to rapidly break down the bond between the extensions and your natural lashes.
However, getting professional removal also has its drawbacks. You may not have the time to visit the salon, and professional removal can cost you anywhere from $15 to $50, while home removal is basically free (aside from the cost of materials).
At home, you may not have the perfect dissolver. Additionally, if you tug on your extensions with force at any point during removal, there is a risk of damaging the lash line or losing natural eyelashes.
Key takeaway: If you’re not prepared to take the time and be patient with the process, it’s better to go to a professional for removal.
Pre‑Removal Preparation (don’t skip this!)
Preparing for eyelash extension removal involves crucial steps to ensure a safe and effective process. Below are key considerations for setting up your workspace, gathering essential supplies, and prioritizing safety measures before initiating the removal procedure.
Gather Necessary Supplies
Before you begin the eyelash extension removal process, ensure you have all the essential supplies within arm's reach. These include your eyelash extension remover of choice, cotton swabs or microfiber brushes, an eyelash spoolie, and cotton pads.
The eyelash extension remover is key to safely dissolving the adhesive holding the extensions in place. Microfiber brushes are handy for precise application and removal.
Set Up a Clean Workspace
Creating a clean and organized workspace is crucial for a smooth removal process. Lay out all your supplies on a clean surface, and have a mirror nearby for easy access. A clutter-free workspace helps you stay focused and reduces the risk of contamination during the procedure.
Protect Your Skin and Eyes
Safety should be a priority during eyelash extension removal. Protect your skin and eyes from any potential remover or adhesive residue contact. Using cotton pads as a barrier can help prevent accidental exposure to the remover, ensuring a safer removal process.
Proper Hand Hygiene
Before you start, wash your hands thoroughly with soap and water. Clean hands are essential to prevent the transfer of dirt or bacteria to your eyelashes and the delicate eye area. Proper hand hygiene is fundamental to ensure a successful and hygienic eyelash extension removal experience.
Pro Tip: Sensitive eyes? Use saline-soaked cotton pads as a barrier between the remover and your skin to keep product off the lash line. Work slowly, one eye at a time, and stop if you feel any stinging.
Choosing Your Lash Extension Remover
When choosing a solvent to remove your lash extensions, you have two main options: A dedicated lash extension remover designed specifically for the job or some sort of household oil, such as mineral/baby oil, coconut oil, or olive oil.
If you’re wearing lash clusters, removal will be fairly easy with either option, but professional extensions require more care.
Professional Remover
Professional removers are the best choice to remove professionally applied lash extensions. They’re designed to rapidly break down the lash extension adhesive, often in under a minute, making removal extremely speedy and effortless.
If you’re new to eyelash extension removal or feel impatient during the waiting process, a professional lash extension remover is the safer choice.
Household Oils
Coconut oil, castor oil, olive oil, baby oil, and Vaseline can all break down lash extension adhesive, but they don't all work equally well. Coconut oil is the most versatile and gentle option. Castor oil doubles as a lash conditioner and works overnight. Olive oil is the slowest. Baby oil (mineral oil) works similarly to coconut oil but doesn't condition the lashes.
|
Oil |
Speed |
Bonus benefit |
Best for |
Watch out for |
|---|---|---|---|---|
|
Coconut oil |
15–30 min |
Moisturizes lash line |
First-time DIY removal |
Coconut allergies |
|
Castor oil |
Overnight |
Conditions and strengthens lashes |
Slow, gentle removal over 2–3 nights |
Thick texture, apply with a Q-tip |
|
Olive oil |
20–30 min |
Mild conditioning |
When other oils aren't on hand |
Slowest of the oils |
|
Baby oil (mineral oil) |
15–30 min |
None for removal |
When you don't have coconut oil |
Doesn't condition lashes; can clog pores around eyes |
|
Vaseline |
Variable, often ineffective |
None for removal |
Not recommended for pro adhesive |
Blurs vision if it enters the eye |
Oils take longer than professional removers and don't dissolve cyanoacrylate adhesive as thoroughly. For best results with any oil, steam the lashes for 10–15 minutes first to soften the bond. Even with steam, there's a higher risk of pulling out natural lashes if you tug, so be patient — let the oil do the work
A note on olive oil. Olive oil works, but it's the slowest of the natural options — expect 15 to 30 minutes per session, sometimes repeated over two nights. It's a fine substitute when coconut or castor oil isn't on hand.
A note on castor oil. If you want a hands-off approach, castor oil can be used overnight instead of as a 2–3 minute warm soak. Dab it onto the lash line with a clean Q-tip before bed, sleep on your back to keep oil away from the eye, and gently comb downward in the morning. Most extensions release on their own after 2–3 nights of consistent use.
Step‑by‑Step: How to Remove Eyelash Extensions at Home
So, how to remove eyelash extensions at home without any lash damage? Here is the best removal method to ensure success, whether you’re using a professional remover or household oil. Don’t skip a single step since each one is essential to getting those extensions off safely and gently.
Remove Makeup And Wash Face
It’s important to remove all makeup and thoroughly wash the face before doing anything else. This ensures dirt and oil won’t get trapped in the lashes or get into the eyes.
Massage the face and eye area gently. Do not attempt to remove the eyelash extensions at this step. It’s too soon in the process and could damage your natural lashes.
Removing With a Professional Remover
If you’ll be using a professional lash extension remover, use a cotton swab or microfiber brush to apply a generous amount to your lashes. Work on one eye at a time, keeping your eye closed to avoid getting remover in it.
Check the remover’s instructions to see how long you should leave it — typically, it’ll need to saturate your lashes for 1-3 minutes, but timing may vary.
Use Steam
If you’ll be using oil for removal instead of a professional lash extension remover, steam is a helpful step before removing eyelash glue. It will loosen the bond holding the extension lashes to the natural lash, ensuring a safe, pain-free, and effective removal process.
There are a few ways to use steam:
- Take a steamy shower.
- Fill a bowl with warm water, place a towel over your head, and lean your face over the bowl to let the lashes absorb the steam.
- Drench a small towel in hot water and lay it over your face.
- Use a facial steamer.
Any of these methods will produce a similar effect. Regardless of the method, make sure to use steam for about 10-15 minutes to gain its full effect in breaking down the glue bonds.

Warm Oil Soak
Now that your lashes are debris-free and the adhesive is softened, the next step for safe removal is applying warm oil to the lashes and lash line.
While you can use oil at room temperature, you’ll get better results if you heat it up a little.
Put the oil of your choice in a small bowl and warm it up on the stove or microwave on low heat for a few seconds. It should be warm, not hot! Test it with your finger to make sure the temperature is pleasant.
Next, dip a cotton round into the oil, close one eye, and gently hold the pad over the lash line for 2-3 minutes. Do not apply force, pull, or tug on the lashes! Let the oil work its magic.
Be sure to keep your eye closed to avoid getting oil into the eye, as this can cause blurry vision.
If you don’t want to warm the oil, simply coat your lashes and allow it to soak for 15-30 minutes before attempting to remove.
Wipe Or Comb
Once the lash glue has softened, the last step is to remove the lash extensions. You can use a lash spoolie, cotton pad, or a swab to wipe or comb away the extension. Use gentle motions, and either wipe downwards or comb upwards, depending on your removal tool of choice.
At this point, the eyelash extensions should begin to slide right off your lash line without any pulling or tugging.
Repeat As Needed
Some eyelashes may hang on a little tighter than others. It’s important to be patient and wait until your eyelash extensions fall off on their own. You can apply more remover or soak your lashes with oil one more time and try combing again, but don’t attempt to pull on the lashes or apply any friction.
You May Need A Few Days
The next morning, continue with your normal face-washing routine and comb through your lashes again. If some eyelash extensions still won’t come off, a great way to disguise them is by curling the lashes gently with an eyelash curler and applying mascara.
Repeat steps 1-4 at night until all the lashes come off and the adhesive is fully broken down. It may take another day or two, but your extensions will come off safely with patience.
What Not to Do When Removing Extensions
When it comes to safely removing your lash extensions, it's essential to know what not to do to prevent damage or discomfort. Here are some crucial guidelines to follow:
- Don't Pull or Tug — Avoid the temptation to pull or tug at your lash extensions forcefully. This can harm your natural lashes and cause discomfort and potential injury to your eye area. Instead, opt for a gentle and controlled removal process.
- No Sudden Movements — Sudden, jerky movements while removing lash extensions can lead to accidents or misapplication of the removal products. Keep your movements slow and deliberate to ensure a safe and precise process.
- Don't Rush — Rushing through the removal process is a common mistake. Take time to apply the remover, let it work, and gently wipe away the extensions. Patience is critical to a successful and damage-free removal.
- Avoid Excessive Rubbing — Rubbing your eyes vigorously during removal can irritate the delicate eye area and potentially damage your natural lashes. Instead, use gentle, controlled motions.
- Don't Skip Proper Aftercare — After removing your lash extensions, it's crucial not to neglect aftercare. Properly clean and moisturize your lashes to ensure they stay healthy and prepared for future applications.
- Avoid Heat — Exposing your lash extensions to excessive heat sources, such as hairdryers or hot steam, can weaken the adhesive and cause premature lash extension loss. Stay away from heat during and after the removal process.
- Don't Reapply Extensions Too Soon — Allow your natural lashes to recover before reapplying extensions. Rushing to reapply them can overload and weaken your natural lashes over time.
How to Remove Eyelash Extensions Without Damaging Your Natural Lashes
The safest way to remove eyelash extensions without damaging your natural lashes is to fully dissolve the adhesive before any contact — letting a professional remover sit for 1–3 minutes, or letting oil soak for 15–30 minutes, before combing or wiping. The single biggest cause of damage is impatience: pulling on lashes before the adhesive is softened. To remove fake eyelashes without ruining your real ones, follow these four rules:
- Soak fully before touching. If a lash resists, reapply remover and wait — never tug.
- Comb, don't tweeze. Use a clean spoolie to gently sweep loose extensions downward. Tweezers and fingers can pull natural lashes out with the extensions.
- Skip alcohol, hairspray, and sharp tools. They damage the natural lash and irritate the eye.
-
Give your lashes a break afterward. No mascara, curlers, or new extensions for 48 hours.
The full list of removal mistakes to avoid is in the 'What Not to Do' section above.
How To Remove DIY Eyelash Extensions
Removing lash clusters is even easier than removing professional extensions.
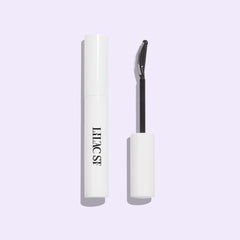
While the methods outlined above will work just fine, you’ll have the most effortless removal with the Lilac St. Bond Breaker Lash Remover (Ciao For Now), a vegan and cruelty-free remover that removes DIY and strip lashes in just a minute.
To remove DIY lash extensions with the Bond Breaker, first saturate your eyes with the product. Leave it on for a minute, and then use your fingers to easily slide off the lash clusters.
This portable remover contains nourishing oils and collagen extract to help keep natural lashes healthy while gently removing lash segments.
If you don't have a bond breaker on hand, you can still remove Bond & Seal clusters using warm coconut oil or any oil-based makeup remover. Follow the warm oil soak steps below with two cluster-specific adjustments: shorten the soak to 2–3 minutes, and slide each cluster off with clean fingers from the inner corner outward instead of combing. Bond & Seal clusters lift off as a single piece.
Aftercare: Protect & Strengthen Your Natural Lashes
If your natural lashes have already been damaged, natural oils, vitamins, and an improved diet are essential for a comprehensive home repair plan.
For more details on how long natural lashes take to grow back and what can help support faster regrowth, see our guide on do eyelashes grow back.
Use Natural Oils
Coconut oil, castor oil, and vitamin E are great for nourishing natural lashes back to life and enriching them with moisture.
To apply, simply use a spoolie or doe-foot applicator and coat your lashes and lash line in oil, careful not to apply any excess that could get into the eyes. Repeat every night for the best results.
Take Vitamins
Some supplements that promote eyelash growth are biotin, vitamin B3, and vitamin C. Taking supplements can kickstart new growth if some lashes have broken off, become thin, or fallen out. Consider speaking to your doctor first to ensure you choose the correct supplements.
Avoid Extensions & Mascara
Giving your eyelashes a bit of a break will also help with the repair process. Waterproof mascara is the worst offender, as removing it often leads to significant lash loss, but taking a complete break from mascaras, lash extensions, and false lashes will allow for the best recovery.
Improve Diet
Incorporating iron-rich foods and natural proteins can aid in the natural eyelash regrowth process. Eating foods such as avocados, spinach, red meat, sweet potatoes, salmon, and eggs is important. These foods have nutrients to create a well-rounded lash repair plan and ensure a speedy recovery.
Try a Lash Serum
When your lashes seem sparse, using a lash serum is an excellent way of actively improving their appearance. A high-quality lash serum will include ingredients proven to improve the look of lash density, making the lashes seem darker, fuller, and longer.
Minimize Friction
Avoid rubbing your eyes to minimize friction against your lashes. Sleeping on your back (or wearing a domed sleeping mask) and using soft cloths for makeup removal instead of rough cotton pads will also help preserve your natural lashes.
Troubleshooting & FAQs
I’m trying to remove my eyelash extensions at home, but they won’t come off. What should I do?
If your eyelash extensions are stubborn, try using a professional eyelash extension remover or visit a professional for removal. The adhesive may require extra attention beyond natural oils.
Can Vaseline remove eyelash extensions?
Yes, although it’s not a method recommended by professional lash technicians. Vaseline is made of pure petroleum jelly, which aids in breaking the glue molecules in the lash adhesive. Just as suggested with the other natural removers, apply the Vaseline after using steam. Coat the lashes and let them sit for about 5 minutes before combing with a lash comb.
Does lash extension removal hurt?
No, lash extension removal should not hurt. Pain could be a sign that the lashes are being removed incorrectly, and the process should be approached with further caution.
If you’re having trouble removing your lashes properly without pain, discomfort, or damage to the natural lashes, book a professional removal instead.
How long does it take to remove eyelash extensions?
Removing eyelash extensions can take as little as a few minutes with a professional remover, or up to a couple of days with a DIY method. This also depends on the type of adhesive used to apply the lashes and how long they have been on.
No matter what, do not rush the process. Rather than picking, pulling, or forcing the lashes that won’t come off, it may be better to try the removal process again the next day.
What if I have a reaction/irritation after removal?
If you feel irritation during eyelash extension removal, stop immediately, rinse your eyes with lukewarm water, and apply saline solution for relief. If irritation persists, consult a professional for guidance and treatment.
Will I lose my natural lashes after removal?
No. With gentle, proper removal, you shouldn’t lose any of your natural lashes — especially if you use a professional-grade remover. That said, improperly applied lash extensions can lead to lash-loss, so your lashes may need some time to recover after removal.
Is it safe during pregnancy?
There is no systemic risk associated with lash extension removal during pregnancy, so it should be fine! Speak to your doctor to confirm, and if you use a household oil as a remover, make sure it’s free of non-pregnancy-safe essential oils.
How long must I wait before wearing extensions again?
If your lashes are in great shape, you can get new lash extensions again soon after your removal. However, if you notice any signs of lash loss or breakage, consider taking a 1-4 week break.
Can I get a lash lift after removing my extensions?
Wait at least 2 weeks after extension removal before booking a lash lift. Your natural lashes need time to recover from the adhesive, and getting a lift on weakened lashes can cause breakage. If your lashes look damaged or sparse, wait 4 to 6 weeks instead.
What should I do if I get a stye while wearing extensions?
Remove the extensions on the affected eye and avoid lash products until the eye has fully healed. Don't apply new extensions until the area is back to normal, adhesives and adhesive removers can irritate already-inflamed skin. For treatment of the stye itself, see a healthcare provider.
Do I have to remove my lash extensions every night?
No, that's only for strip lashes and false eyelashes. Professional eyelash extensions and DIY lash clusters with proper bond are designed to stay on for 1–3 weeks at a time. Removing them daily would defeat the purpose and damage your natural lashes.
Key Takeaways
The bottom line when it comes to lash extension removal is that you can do it at home — as long as you take your time and go about it carefully.
Removing your lash extensions at home is the more affordable option, and it’ll also save you a trip to the salon, but you’ll need to be patient and careful. Otherwise, professional removal is your best option.
You’ll see the best results if you use a professional lash extension remover designed for the job. In a pinch, household oils will work as well, as long as you pre-steam your lashes and avoid tugging or pulling on the extensions.
Afterwards, gentle care and nourishment will help nurse your lashes back to life.